Introduction
Tuya Cloudcutter is an essential tool for wirelessly flashing Tuya IoT devices equipped with Beken-based chipsets to control it locally with your home automation system.
Controlling your IoT device locally can enhanced security with greater privacy, and reduced latency, as there’s no need for data transmission to Tuya cloud servers.
Most importantly, you retain the ability to control your devices even in the event of an internet outage.
The great thing about wireless flashing is that it saves you a ton of time by skipping the whole process of opening up your device and soldering jumper wires. Moreover, it reduces the risk of accidentally damaging your device.
The installation process is pretty much the same as setting up on a larger Raspberry Pi model, such as Raspberry Pi 3, 4 or 5.
However, there’s a key difference: the Pi Zero doesn’t include an Ethernet port. During the firmware flashing process, Tuya Cloudcutter requires internet connectivity and also needs the same Wifi port to connect to the target device. Once connected to the target device, it will lose internet connectivity.
This means you’ll have to take a few extra steps to configure the Pi Zero to access the local network using a USB cable connected to your computer.
I’ve use remixed version of slim Pi zero 2w case designed by Marius. Additionally, I used a 2mm drill bit to create a hole roughly above the Pi’s status LED location. This simple modification makes it easier to keep track of its status. (https://www.printables.com/model/148734-slim-raspberry-pi-zero-wh-zero-2-w-case)
About Raspberry Pi Zero 2W Case
Make Raspberry Pi Image
Begin by creating a Raspberry Pi image on a microSD card. I’m using the Raspberry Pi Imager and “Pi OS Lite Bullseye 32-bit version from 2022-04-04” image, as specified in the Tuya Cloudcutter documentation to minimize potential compatibility issues.
I recommended choosing a good-quality microSD card from a reliable source. This choice will spare you from unnecessary frustration.
Tuya Cloudcutter needs to build a Docker image in the card. Using a slow card combined with Pi Zero2’s limited computing power could significantly increase the setup time.
Trust me on this – I initially used an unbranded 8GB microSD card that came bundled with a 3D printer, and it took much longer than expected.
Switching to a Sandisk microSD Card made a noticeable difference in speed.However, be cautious of counterfeit cards, especially the incredible cheap one that flooding in Aliexpress. Ensure to purchase from official sellers to avoid any issues.
Note about microSD Card
- Download the Raspberry Pi Imager: https://www.raspberrypi.com/software/
- Download the 2022-04-04 Raspberry Pi OS: https://downloads.raspberrypi.org/raspios_lite_armhf/images/raspios_lite_armhf-2022-04-07/2022-04-04-raspios-bullseye-armhf-lite.img.xz

- Open Raspberry Pi Imager and select Raspberry Pi Zero 2 W from the device list.
- In “Operating System” scroll down to “Use custom” and select the OS image file you just downloaded.
- Select the destination microSD card in Storage.
Click NEXT and Click “Edit Setting” to enter OS Customisation.

Edit Pi OS Image Settings
Now it’s important to set the initial OS settings so you can easily access it via SSH. Before writing the image, Click “Edit setting“
- Optionally – rename the username and hostname to the name you can easily remember and set the password for accessing it via SSH.
- Fill in the wireless LAN SSID and password.
- In “Services” tab and enable SSH.
Then Save the setting and write the image.

Edit “config.txt” and “cmdline.txt”
After finishing writing the image, open the mounted microSD card folder and edit the config.txt file in the root folder with a text editor. Add dtoverlay=dwc2 at the end of the file, then save it.
dtoverlay=dwc2Next, edit cmdline.txt and add modules-load=dwc2,g_ether after rootwait. Here is an example code from my Pi; your code may differ, so please double-check.
console=serial0,115200 console=tty1 root=PARTUUID=f7c6e9b7-02 rootfstype=ext4 fsck.repair=yes rootwait modules-load=dwc2,g_ether cfg80211.ieee80211_regdom=THNow you can unmount the microSD card and insert it into the Raspberry Pi.
Setup Internet Sharing via USB on MacOS
Connect the Pi to a computer with a Micro USB cable. The data port on Raspberry Pi Zero is the USB port on the left.
The micro USB cable can supply enough power for the Pi so I don’t need an additional USB cable on the power port.
After the Raspberry Pi finish booting up, go to “Network” in “System Preference”. You’ll see the device show up as an RNDIS/Ethernet Gadget.
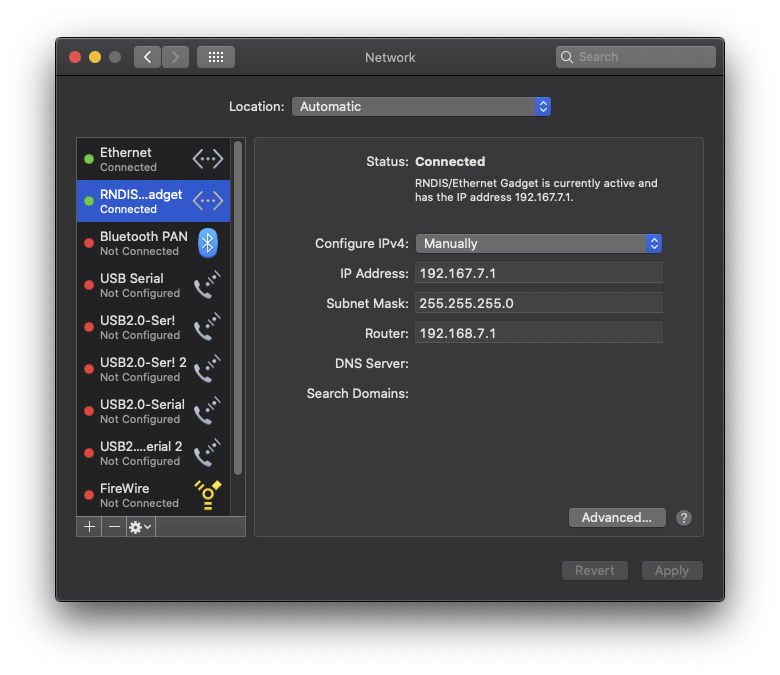
The default IP4 config probably be DHCP by default so change it to Configure IP4 Manually. Pick the IP address that is different from your main local network. My main local network IP is 192.168.1.x so I picked 192.168.7.x.
- Configure IPv4: Manually
- IP Address: 192.168.7.1
- Subnet Mask: 255.255.255.0
- Router: 192.168.7.1
Share Internet Connection to RNDIS/Ethernet Gadget
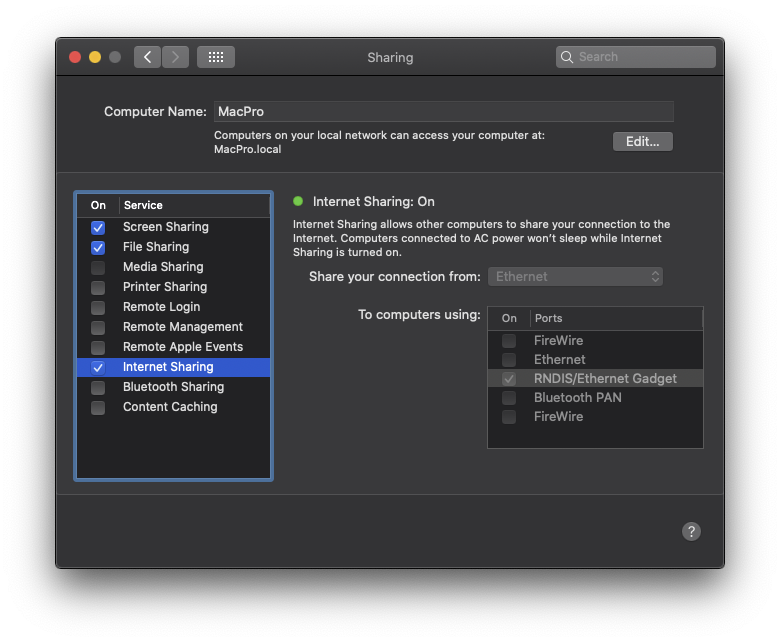
Open “Sharing” in “System Preferences” and turn on “Internet Sharing”. In the box on the right select your existing internet connection to share from. Then select share to RNDIS/Ethernet Gadget.
If “Internet Sharing” is already enabled, you may need to turn it off in order to configuring the options on the right.
Config Raspberry Pi and Disable Wireless LAN
To connect to the Raspberry Pi from the Mac Terminal using SSH, use the following command with your username and hostname. If you didn’t set them in OS Customisation earlier, the username is "pi" and hostname is "raspberrypi.local"
ssh pi@piusb.localThen enter the password, default is "raspberry".

1. Update Package and Network Manager
Execute the command below to update packages and install the network manager. This process may take some time.
sudo apt update && sudo apt install network-manager2. Disable Pi Wireless Lan
Edit the dhcpcd.conf file using the following command and add denyinterfaces wlan0 at the end.
sudo nano /etc/dhcpcd.conf3. Edit “NetworkManager.conf”
Use the command below to edit the NetworkManager.conf file:
sudo nano /etc/NetworkManager/NetworkManager.confModify the file to look exactly like this:
[main]
plugins=ifupdown,keyfile
dhcp=internal

[ifupdown]
managed=true

[keyfile]
unmanaged-devices=interface-name:usb*
4. Assign Fix IP Address for Raspberry PI (Optional)
Assign fixed IP address to the Pi will allow you to SSH it with IP instead of hostname.
sudo nano /etc/network/interfacesAnd add the following code to the end. (Change the IP address to reflect your network setting)
allow-hotplug usb0
iface usb0 inet static
   address 192.168.7.2
   netmask 255.255.255.0
   network 192.168.7.0
   broadcast 192.168.7.255
   gateway 192.168.7.1
5. Reboot the Raspberry Pi.
sudo rebootNow the Raspberry Pi should connect to the network via a USB cable connected to your computer. After reboot, reconnect to Pi via SSH. Then try
ping google.comTo verify a fixed IP address, use the following command.
ifconfig usb0

Install Docker and Tuya Cloudcutter
Now if everything working as expected, it’s time to install Tuya Cloudcutter.
In the terminal
1. Install Docker
curl -fsSL https://get.docker.com -o get-docker.sh && sh get-docker.sh2. Install Git
sudo apt install git3. Install Tuya Cloudcutter
git clone https://github.com/tuya-cloudcutter/tuya-cloudcutterIn case you need to update Tuya Cloudcutter. Use the following command.
cd tuya-cloudcutter
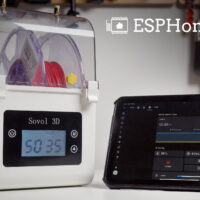
git pullNow you’re ready to wirelessly flash firmware to Tuya IOT device. In next post, I will show you how to flash LDNIO Wifi Power Strip with ESPHome firmware and integrated it to Home Assistant.
How to Flash LDNIO Smart Power Strip with Tuya Cloudcutter for Home Assistant Integration:
Conclusion
In conclusion, while setting up the Raspberry Pi Zero 2W may require a bit more effort, its affordability compared to other Raspberry Pi models makes it a worthwhile investment. Despite its lower cost, it is powerful enough to run Tuya Cloudcutter smoothly.
For Windows users, please note that I encountered difficulties with my Windows laptop network adapter not supporting internet sharing over RNDIS, preventing me from testing its functionality on Windows. However, you can refer to this guide for setting up Ethernet Gadget on a Windows host: https://learn.adafruit.com/turning-your-raspberry-pi-zero-into-a-usb-gadget/ethernet-gadget.


I got it working on Windows 11 by following/installing the RNDIS Gadget driver from (rpi0 was showing as COM in device manager):
https://medium.com/@michi.hammerl/setting-up-a-raspberry-pi-for-usb-gadget-mode-in-windows-11-7993ddf2f80e
Then adding a static MAC address to the end of /boot/cmdline.txt enabled Internet on device:
g_ether.dev_addr=5a:77:1e:af:8e:9e g_ether.host_addr=72:8d:1f:c4:e8:ca