Introduction:
Today, I want to share a cool project where we’re reviving a budget PD charger that I snagged from AliExpress. This little guy surprised me, it can delivering more power than expected. But, it had a broken shell. Instead of tossing it, I thought, why not give it a DIY makeover? Let’s dive in!
The PD charger featured in this video is no longer in production. But I hope this video sparks ideas on how to repair and repurpose electronics using a 3D printer instead of discarding them.
Choosing to fix and upgrade gadgets rather than replace them can contribute to reducing electronic waste, helping to save the Earth one device at a time.
Material List
3D PRINT PARTS
- Printables.com: PD Charger Upgraded Enclosure
- Thingiverse.com: USB PD Charger Upgraded Enclosure
COMPONENTS FOR THIS PROJECT
- IEC320 C8 AC Socket: Aliexpress | Shopee Thailand
- KCD1 Rocker Switch: Aliexpress | Shopee Thailand
- Button Head M3 10mm Screws (2x): Aliexpress | Shopee Thailand
- Button Head M3 8mm Screws (4x): Aliexpress | Shopee Thailand
TOOL I USE
- ARROWMAX Electric Cordless Screwdriver (SES): Aliexpress
- Yihua Desoldering Iron: Aliexpress | Shopee Thailand
- FNB38 USB tester: Aliexpress | Shopee Thailand
- DIY 120 mm Soldering Fume Extractor:
- DIY Makita T12 Soldering Station:
FILAMENT USE IN THIS PROJECT
- eSun ABS+: Aliexpress | Shopee Thailand
- eSun PETG: Aliexpress | Shopee Thailand
- eSun PLA+: Aliexpress | Shopee Thailand
► SUBSCRIBE TO SIMPLY-MAKER YOUTUBE CHANNEL:
The Impressive PD Charger:
In a previous video, I explored how to select a PD charger for an older laptop that came with standard power supply. Surprisingly, it outperformed expectations by delivering up to 20V at 2.25 amps through its USB-C ports. Unlike many low-cost chargers, with the USB-C output and labeled with high wattage, but it maximum output is limited to just 5V.

But there’s a catch: simultaneously, the maximum voltage drops to 5V. Anyway, it still impressed me, especially considering its mere its price tag.
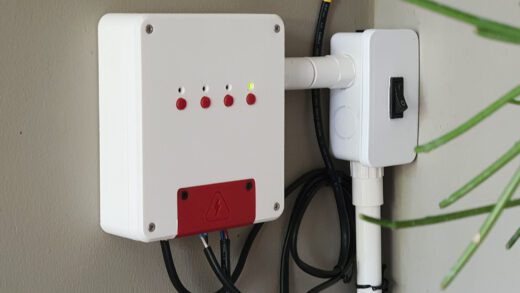
However, the outer shell suffered damage, prompting me to embark on a mission to give it a second chance. To revive this PD charger, I decided to design a new shell, incorporating a rocker switch and an IEC320 inlet.
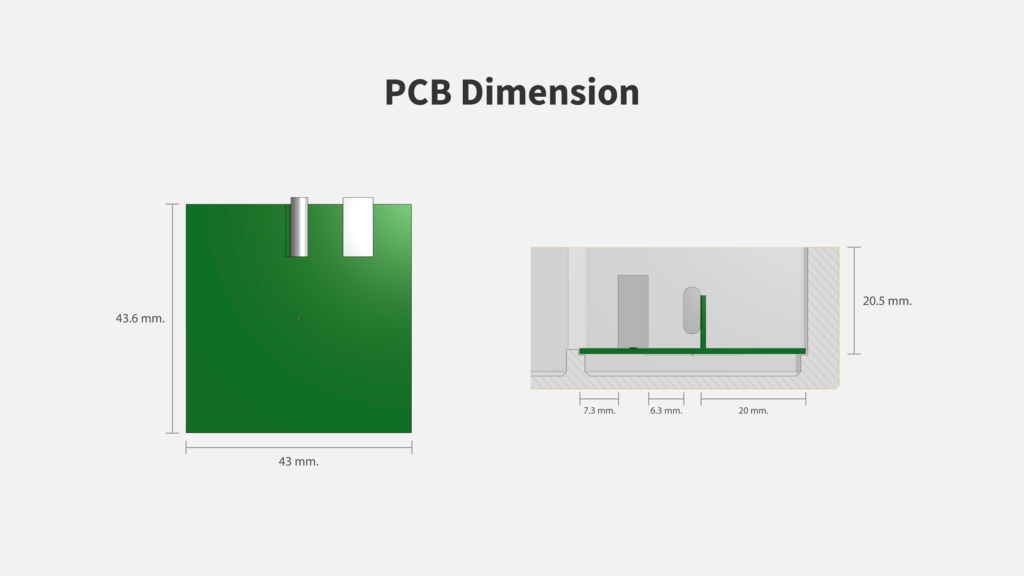
Unfortunately, I just discovering that the charger had been discontinued and replaced with a newer model. Uncertain about the compatibility of the new model’s PCB dimensions, I shared the dimensions used in this design through a following diagram. I’ve included a download link for “.STL” files along with the ”.STEP“ file in case you have a similar charger and need some modification.

Conclusion:
In conclusion, this project showcases the power of DIY and 3D printing in extending the lifespan of electronics. Even though the specific PD charger featured in this video is no longer in production, the principles demonstrated here can be applied to various gadgets, contributing to a reduction in electronic waste and a positive impact on the environment.
Join the DIY Movement:
If you enjoyed this tech makeover, consider embracing the DIY spirit. Give it a thumbs up, subscribe for more projects, and share your thoughts or project ideas in the comments.
WARNING: This project involves working with AC power, which can be dangerous and potentially lethal if proper safety precautions are not taken. Please ensure that you have a solid understanding of electrical safety before attempting this project. If you are unsure or uncomfortable working with AC power, please seek the assistance of a qualified electrician. Always disconnect the power source and discharge any capacitors before working on any electrical circuit. Failure to take appropriate safety measures can result in serious injury or death.


