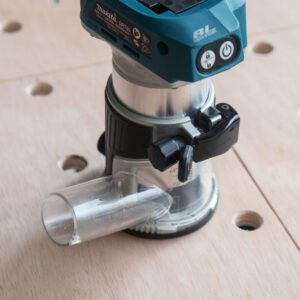
A router is one of the dustiest tools in woodworking. I have a Makita DRT50 Compact Router (sold as Makita XTR01 in the U.S.), which comes with a dust nozzle (Part No. 195559-1). It works great in most situations, especially when routing grooves.
Makita DRT50 Dust Port
But when doing edge trimming, where most of the router base is hanging over the edge of the wood, the original dust port doesn’t help much. Most of the dust still ends up flying around the workspace.
I found some great commercial options like the Rockler Dust Right Edge-Routing Dust Port, but they’re a bit bulky and designed to fit 2-1/2″ dust hoses, which isn’t ideal for my small vacuum cleaner.
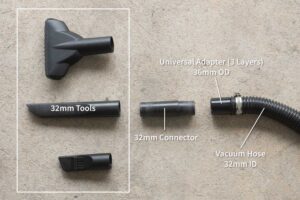
So, I decided to design my own compact 3D printed dust port that mounts a vacuum hose under the router base to collect dust much more efficiently during edge trimming. It’s designed to connect with vacuum attachments that have a 36 mm outer diameter, commonly used in small home workshops.
I designed the edge trimming dust port in two main parts for easier 3D printing. The top and bottom sections are connected with a dovetail slot, allowing the bottom bucket to slide up and down to adjust the mouth height for different workpiece thicknesses. It can slide from 30 mm (closed position) up to 45 mm (maximum opening). Keeping the bucket closer to the workpiece helps improve dust collection performance.
NOTE: The first design included a removable dust port that could be twisted into the bucket, allowing easy swapping between different hose sizes or replacing the hose adapter with a dust cover when a vacuum wasn’t used. After testing, I realized the design could be simplified and made more compact. The final version combines the dust port and bucket into a single piece. I’ve also included the first version on the download page in case you need compatibility with 32 mm accessories.
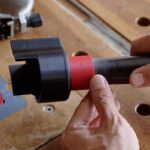
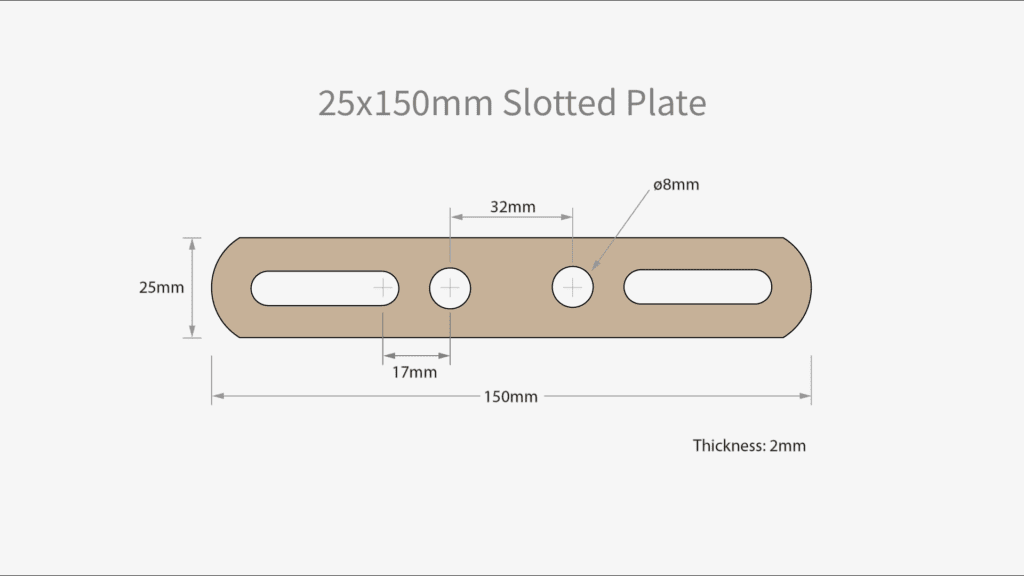
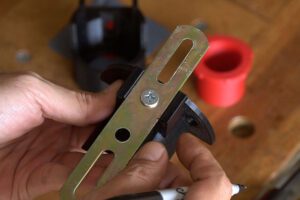
The dust port attaches to the router base using a 20 mm metal sliding plate, cut to the desired length, and secured to the 3D print part with an M6×15 countersunk screw. The plate can slides into the guide holder slot on the side of the router base and locks with the existing clamp screw, making it quick to attach and remove without any modification.
For extra stability, I also added optional mounting screw holes to mount it to the base. You can use them by removing the screw under the router base that holds the plastic base protector, positioning the dust port, and reinstalling it with a slightly longer screw. However, I generally prefer using only the clamp screw mount, as it provides a secure hold while remaining quick and easy to remove.
This dust port is designed for the Makita round base (Part No. 196613-4), but it also fits the Makita-compatible square bases. It may also work with other 65 mm router bases that include a guide holder on the side.
NOTE: The extra mounting holes position under the base are designed specifically for the round base and will not align properly with the other base.
Assembly Steps
Before assembly, check that all printed parts fit together properly. The 3D-printed pieces may need a bit of cleanup, especially around the dovetail slot, to ensure smooth sliding between the top and bottom sections.
I used a metal file to clean up the slot and flatten the surface. I printed mine with a 0.6 mm nozzle, so the corner bulging around the slot was quite noticeable and required some sanding to achieve a snug, smooth fit.
Note: The fit of 3D-printed parts may vary slightly depending on your printer and slicer settings. When I switched slicers, the same model printed with a slightly different fit. I compensate the part based on my printer’s tolerance. You might need to adjust the scale slightly or use a bit of tape or sealant to get the perfect fit for your setup.
Begin by inserting two M6 heat-set insert nuts into the top part. These will provide threaded holes for the locking knob and the sliding plate.
Next, temporarily attach the 20 mm slotted plate to the top hole using an M6×15 countersunk screw.
Mark the plate length so it fits neatly along the edge of the top part, then trim it to size. Also, cut a small section to open the slotted side so the plate can slide smoothly into the guide holder.
I used an angle grinder for cutting and a metal file to smooth, straighten, and remove any sharp edges or burrs.
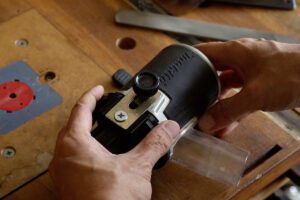
Once the plate fits properly, reattach it to the top section and secure it with the screw. At this point, you can test-fit the dust port on your router base to ensure it slides easily into the guide holder and locks firmly using the clamp screw.
Next, slide the bottom bucket into the dovetail slot on the top section, check that the bucket slides smoothly and locks securely in position. Then lock it in place with an M6 knob.
If the 3D-printed knob and hex screw feel loose, add a small drop of hot glue inside the knob’s hex slot to hold the screw firmly in place.
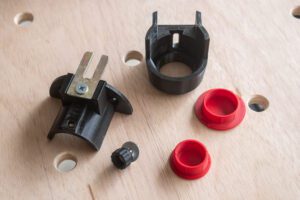
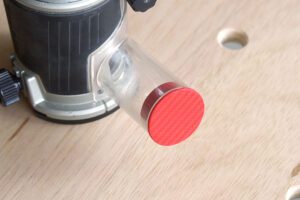
Optional Dust Cap
32mm Cap for Makita DRT50 Dust Port
During testing, I noticed a small amount of dust still escaped from the original dust port on the router.
To fix this, I designed a simple cap to block it off completely, forcing all the dust to flow through the new collector bucket and into the vacuum — which greatly improves suction and dust collection efficiency.
I also included an 36mm cap to close the hose port when a vacuum isn’t used, allowing it to function as a passive collector that traps dust directly into the bucket.
On the tool side, I can directly connect the hose to most of my power tools, such as a circular saw and a random orbital sander. However, for the Makita compact router, I need to use the 32 mm adapter, which also allows me to connect to 32 mm vacuum tool nozzles.
Festool-Style Hose Compatibility
Recently, I upgraded to avacuum hose with a rotating connector, which makes it much more comfortable to use with power tools. It’s advertised as being compatible with Festool vacuums, and at first, I thought it would be easy to connect to my setup since I already have plenty of adapters.
Unfortunately, the tool-side connector didn’t fit any of my power tools or 32 mm vacuum attachments, even with all the adapters I already had.
To fix this issue, I created a variation of the bucket with a 33 mm inner diameter, sized specifically to match the Festool-style hose. This lets the hose connect directly to the dust port without needing any additional adapters on the router side.
I also designed and 3D printed an adapter that converts the tool-side connector to 36 mm OD, and another adapter for the vacuum-side to fit my cyclone separator directly. This keeps the whole system consistent and compatible with my existing setup.
If you’re using a similar hose, you can check out the adapter design here.
Note:
I don’t own Festool equipment, so I can’t confirm compatibility with the official Festool system — only that these parts fit the hose I purchased.
Conclusion
This 3D printed edge trimming dust port has made a huge difference in keeping my workspace clean. It’s compact, easy to attach, and does a much better job collecting dust than the original Makita dust nozzle when edge trimming, where most of the base hangs off the workpiece.
The sliding bucket design allows for easy height adjustment to match different workpiece thicknesses, and the clamp screw mount makes it quick to install or remove without any modification to the router. With the optional caps, you can choose to use it either with a vacuum or as a simple dust collector bucket when connecting a hose isn’t convenient.
If you already own a Makita DRT50 / XTR01 Compact Router, this is a small but very useful upgrade that helps keep your edge-trimming projects much cleaner.
Let's Make Things!
Our blog is all about making practical and budget-friendly gadgets.
We will show you simple and cost-effective ideas to enhance the items around you to work better and make your life easier.
Choosing to fix and upgrade gadgets rather than replace them can contribute to reducing electronic waste, helping to save the Earth one device at a time.